Working with HDC Project Files in the Portal
- Data Stewardship
- Uploading Files
- Checking File Status
- Viewing File Properties
- Previewing Files
- Adding and Modifying File Tags
- Adding and Modifying File Attributes
- Requesting File Copy from the Green Room to the Core
- Viewing Data Lineage
- Downloading Files
- Deleting Files and Folders
- Creating File Collections
- Adding Files and Collections to Favourites
Data Stewardship
Users are reminded to abide by the Platform Terms of Use and any Project-specific restrictions when using the Portal to access data.
Uploading Files
All files uploaded to the platform land in the Green Room. In this isolated storage area, the only people who can view and download the files you have uploaded are you and the Project Administrator(s). Project Administrators can verify that the data are compliant with the Project’s data management plan before being copied to the Core where all other Project members (except Project Contributors, see Managing HDC Projects > Project Roles) can view and access the file.

Prerequisites
- Membership in the Project (any role) or Platform Administrator
- Stable internet connection
Steps
Navigate your Project’s File Explorer, click Green Room, and select a destination folder.
- Unless otherwise specified, files will be uploaded into your top-level personal Green Room folder denoted by your username.
- To upload the file to a sub-folder, click an existing sub-folder to open it or click + New Folder to create a folder then click to open it.
- If you’re a Project Administrator, you can select and upload to any folder in the Green Room.
Click Upload.
- Check the Project field and destination folder name to confirm you’re in the correct Project and destination.
- Click Select, choose Select Files or Select Folder, then choose files or folders from your local computer.
- Review the file list. To remove a selected file, hover on the file name and click the Trash icon.
Add desired optional elements:
- Tags: Enter one or more Tags (keywords) to attach to all the selected files. Note: adding tags during upload is not available for folders. To add Tags to a folder, upload the folder first, then use one of the alternate methods described in the section Adding and Modifying File Tags.
- Attributes: If Attributes have been configured by the Project Administrator, a dropdown menu will be visible and you’ll be prompted to enter file attributes. See Adding and Modifying File Attributes for more information.
- Click Upload to initiate the file upload, or Cancel to exit without uploading.
- The progress of file upload can be checked by clicking the the File Status icon from the Main Menu. See Checking File Status in this article for more information.
- When the file or folder is uploaded it is stored in your Green Room folder denoted by your username.
Considerations
- Large file uploads: The portal supports upload of files up to approximately 10 GB at a time. Upload performance may be impacted by your internet connection. If you need to upload larger files, consider using the Command Line Tool. If you need to upload an extremely large number of files (e.g., many tens of thousands) in one session, it is recommended to use an alternative upload method such as the Command Line Tool or a custom direct integration (contact Support for more information).
- Compressed files: The portal supports upload of individual files or entire folders, including compressed folders (e.g., .zip, .tar, .rar archives). Compressed files can be previewed using the File Preview tool (see Previewing Files in this article), and extracted or decompressed using one of the Workspace tools.
- Moving and renaming files and folders: Once a file or folder is uploaded it cannot be moved or renamed in the Green Room File Explorer. Instead, you can re-upload the file or folder with a different name or destination, or copy the file or folder to the Core and use the Workspace tools to organize the Project files.
- Uploading duplicate files: Duplicate files cannot be uploaded to the same destination folder. If you attempt to upload a file that already exists in the destination folder with the same filename, an error message is returned. Instead, you can either upload the file with a different filename, or create a new Green Room folder and upload the file to the new folder.
Checking File Status
You can check the progress and completion status (success or failure) of Project files uploaded, downloaded, and deleted during the current login session using the File Status panel. Click the File Status icon in the Main Menu to open the File Status panel then browse the activity tabs (In Progress, Uploaded, Downloaded, Trash Bin).

To view the complete history of all Project files uploaded, downloaded and deleted, not just activities in the current login session, use the File Stream Advanced Search.

- Navigate to the Project Canvas and locate the Recent File Stream panel.
- Click Advanced Search to open the File Stream Advanced Search.
- Select your search criteria and click Search. Results are sorted by date with the most recent on top. Only successful file actions are captured - file uploads and downloads that were attempted but failed are not displayed in the history.
Resuming Failed Uploads
If a file fails to upload from the Portal, a pop-up message alerts you and the Project File Status panel returns a “Failed” status in the In Progress activity tab. Try checking your internet connection and refreshing your login session, and consider the size of the file/folder being uploaded. If the file exceeds the recommended upload capacity of the Portal, consider using the Command Line Interface.
The Portal provides the ability to resume a file upload already in progress so you don’t have to restart the upload from the beginning.

To resume a file upload after a failure:
- Re-establish your upload environment by checking that your internet connection is working, refreshing the File Explorer page, and/or logging back into the Portal.
- Open the File Status panel and check the In Progress tab for the failed file. Click Re-upload file and select the same file from your local source folder.
- The upload resumes as shown by the progress bar and successful completion is indicated in the File Status panel.
Viewing File Properties
The File Properties panel displays detailed metadata about Project files to help find them and facilitate their appropriate use.
To view the File Properties:
- Select a file in the File Explorer.
- Click the Action icon (three dots) beside the file.
- Select Properties to open the Properties panel.
Properties include:
- File metadata such as filename, user who uploaded the file, date and time uploaded, file size, and ID – an object identifier that uniquely identifies the file in the platform.
- User-added metadata such as Tags and Annotations
- System Tags, for example, copied-to-core to signify a file has been copied to the Core.
For a detailed description of other information available in the File Properties menu, see sections Adding and Modifying File Tags, Adding and Modifying File Attributes, and Data Lineage Graph.
Previewing Files
The File Previewer can be used to check the inner folder structure of uploaded file archives. Supported types include:
- Zip: .zip
- Tar: .tar, .tgz, .tbz, .txz, .tar.gz,.tar.br, .tar.bz2, .tar.xz, .tar.zst.
- 7zip: .7z
- RAR: .rar

- Locate the file in the File Explorer.
- Click the Action icon (three dots) beside the file and select Preview (only visible for archive file listed above).
- In the File Previewer, click to expand or collapse the folders and view the inner folders.
- Click OK to close the File Previewer.
To unzip the file, use one of the available workspace tools such as a Jupyter notebook in JupyterHub (see Using HDC Workspace Tools).
Adding and Modifying File Tags
File Tags are keywords assigned to files and/or folders to help describe them and allow them to be found. Two types of tags can be associated with Project files:
- System Tags are applied automatically during a platform supported action. For example, the System Tag copied-to-core is attached to a file when it is copied from the Green Room to Core. System Tags cannot be changed by users.
- Customized Tags are applied by users during file upload, and can be added or modified after upload.
System and Customized Tags are visible in a file or folder’s General Properties. Additionally, you can search all Project Files for specific Customized Tags by using the Project Search tool (see Projects Interface > Search in the article HDC Portal Navigation).
Customized Tags can be added and/or modified using one of the following methods:
Method 1: during File upload
Not available for Folder upload.
- Begin a File upload (see Uploading Files)
- In the Tags window, enter one or more Tags.
- Complete the remaining fields and click Submit.
Method 2: from the File Properties panel
Recommended for quick tagging of individual files or folders in the Green Room or Core.
- Select a file or folder in the File Explorer, click the Action icon (three dots) beside the file, then select Properties to open the File Properties panel.
In the General section, Click Edit Tags to add or delete Customized Tags.
- NOTE: When using this method, tags attached to folders don’t propagate to the files inside. To add tags in bulk to the folder contents, use Method 3.
Method 3: from the Project File Explorer
Recommended for bulk tagging of files and folders.

- Navigate to the Project File Explorer (Green Room or Core).
- Select one or more files and/or folders by clicking the checkbox beside each one, then click Add/Remove Tags in File Explorer menu.
In the popup window, select one of the following options from the dropdown:
- + Add Tags to enter one or more Customized Tags.
- - Remove Tags to delete an existing Customized Tag.
- Enter the name(s) of the tags to be added or removed.
- If you selected a folder, the tag(s) will be added or removed from all files inside the folder, but not to the actual folder(s). If you also wish to add or remove the tag on the folder as well, click the checkbox Add tag to all the folders.
- Click Add Tags to complete the action and close the menu.
Considerations
- Tags can contain 1 - 32 characters consisting of lowercase letters, numbers and/or hyphens.
- When typing multiple tags in the entry line, be sure to hit Enter after each one to save it.
- A maximum of 10 tags are allowed per file or folder.
- In the Green Room, Customized Tags can only be added or edited by the Project Member who uploaded the file, or the Project Administrator. In the Core, Collaborators and Project Administrators can edit Customized tags of files in any folder.
- Tags can also be attached to Projects and Datasets.
Adding and Modifying File Attributes
It may be important to annotate your uploaded Project files with descriptive metadata that conform with your own defined categories, formats, or values to make the files more readily searchable and machine readable. For example, when uploading a file containing test scores you wish to specify metadata on the research site that performed the test, or on a DICOM imaging file you wish to specify the MRI scanner manufacturer. File Attributes enable this enriched metadata capture on files.
Project Administrators create custom File Attributes for the Project using the File Attributes template (see Managing File Attributes Templates in the article Managing HDC Projects). If File Attributes have been configured for your Project, the attributes are available for all Project Members to annotate files using one of two methods:
Method 1: during File upload
Use this method to add Project-specific metadata annotations to your files on upload.

- Begin a File upload (see Uploading Files)
- Select a File Attribute template from the dropdown menu (only visible if the Project Administrator has configured File Attributes) and enter the requested information. File Attributes can be either required or optional on upload depending on how the Project Administrator has configured them.
Note: If multiple File Attribute templates are available, a file can only use one template. - Complete the remaining fields and click Submit.
Method 2: from the Project File Explorer

- Navigate to the Project File Explorer Green Room or Core.
- Select one or more files and/or folders by clicking the checkbox beside each one, then click Add Attributes in File Explorer menu.
- Select an Attributes template, complete the information, and click Submit.
File Attributes added to a file or folder are visible in its Properties menu in the File Explorer. Additionally, you can search all Project Files for specific File Attributes by using the Project Search tool (see Projects Interface > Search in the article HDC Portal Navigation).
Requesting File Copy from the Green Room to the Core
The Core is the storage area where Project members can access each others’ Project files, create file collections, and use the workspace tools to open files and perform analyses.
Before a file is copied from the Green Room to the Core, it must be pseudonymized to the extent necessary to fulfil the Project objectives and agreements. Only Project Administrators can copy files from the Green Room to the Core (see Managing HDC Projects > Files Copy from the Green Room). However, Project members can mark files and/or folders in their Green Room folder and submit a request to the Project Administrator to copy the files to the Core.
To submit a request to copy data from the Green Room to the Core (requires Collaborator role),

- Navigate to the Project File Explorer Green Room
- Select one or more files and/or folders to be copied by clicking the checkbox beside each one. The Request to Core option becomes visible in the File Explorer menu.
- Click Request to Core.
- Select a destination folder in the Core. Destination folders are denoted by Project member usernames (if unsure, select your own username folder).
- If desired, enter any remarks for the Project Administrator in the Request Notes field.
- Click Confirm.
- The Project Administrator will receive an email notification with your request details and will need to log into the Portal to approve the request. After approval, your requested files will be visible in the Core destination folder.
To view your submitted and approved requests:

- Click the Requests icon from the Project left menu bar.
- Click New to view your new requests that have not been fulfilled, or Completed to view requests that the Project Administrator has fulfilled. Requests are identified by the username and the date/time stamp when the request was submitted.
Viewing Data Lineage
When you copy data from one location to another, execute a pipeline, or perform other actions on a file, the platform data lineage service captures the points in the file’s journey and displays them in the File Properties Data Lineage graph.
To access a file’s Data Lineage Graph,
- Locate the file in the Green Room or Core File Explorer.
- Click the Action icon (three dots) beside the file and open the Data Lineage Graph.
- Hover over the graph icons to explore the points in the file’s lineage.
- Click See More to explore the graph and use the dropdown menu to switch views between All Nodes, or just Upstream or Downstream. The lineage nodes (icons) are explained below.
Upstream and Downstream Lineage
- Nodes represent the state of a file resting in storage.
- Pipelines describe actions that change the state of a file.
- Upstream lineage displays the points in a file's journey up to its current state. For example, a file newly uploaded to the Green Room has only one upstream point, the Green Room File node, representing the point when the file was introduced the the platform.
- Downstream lineage displays points in a file’s journey from a specific state forward. For example, when viewing the lineage of a file stored in the Green Room that was later copied to the Core, the downstream lineage displays the Green Room File node, the copy Pipeline, and the Core File node.

Downloading Files
Files can be downloaded individually or in bulk directly from the File Explorer.

- Before downloading a file, check your browser settings and ensure that pop-up windows are enabled.
Navigate to the Project File Explorer Green Room or Core.
- For a single file download, select a file, click the Action icon (three dots) beside the file, then select Download.
- For bulk file download, select one or more files and/or folders by clicking the checkbox beside each one (or use the select all checkbox), then click Download in File Explorer menu. Bulk file downloads are packaged into a .zip file.
- Open the File Status panel to check the status of your downloads.
- Open the Downloads folder on your local computer to find the downloaded file(s).
Considerations
- Download permission is role-based - any Project member can download files that they uploaded in the Green Room, Collaborators can download files from any folder in the Core, and Project Administrators can download any file from any location.
- Download performance may be impacted by your internet connection.
- Ensure pop-ups are enabled in your browser.
Deleting Files and Folders
Moving Items to the Trash Bin
Project members can move files or folders that are no longer needed in the Green Room or Core to the Trash Bin. Items in the Trash Bin can be marked for permanent deletion (see below), or restored back to the original location in Green Room or Core.

- Navigate to the Project File Explorer Green Room or Core.
- Select one or more files and/or folders by clicking the checkbox beside each one (or use the select all checkbox), then click Move to Trash Bin in File Explorer menu.
- A popup window prompts you to confirm the file deletion. Click OK or cancel to exit without deleting.
- The file is moved to the Trash Bin.
Open the File Status panel to check the status of the single file deletion, or open the Trash Bin in the left menu of the File Explorer to view items in the Project`s Trash Bin (your role in the Project governs what items are visible to you).
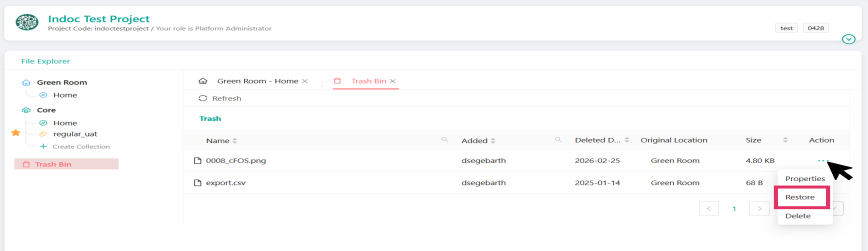
Restoring Items from the Trash Bin
All Project members can restore items visible to them in the Trash Bin back to their original location in the Green Room or Core. For this:
- Navigate to the Project File Explorer Trash Bin.
- Use the Actions Menu (three dots) in the row of the respective item you´d like to restore to open the Actions drop down menu.
- In the Actions drop down menu, click Restore to restore the item to its original source location in the Green Room or Core.
Mark Items for Deletion
Items in the Trash Bin will not be deleted automatically and continue to consume your Project´s available resources. As a Project Administrator, you can go to the Trash Bin and mark files and folders for permanent deletion. For this:
- Navigate to the Project File Explorer Trash Bin.
- Use the Actions Menu (three dots) in the row of the respective item you´d like to mark for permanent deletion to open the Actions drop down menu.
- In the Actions drop down menu, click Delete to mark the item for permanent deletion.

Restore Items before Grace Period Expiration
Once an item has been marked for permanent deletion, it can still be restored until a grace period of 30 days has expired. This action can be performed only by the Project Administrator who marked the item for deletion. For this:
- Go to your User Account page by clicking on your username in the upper right corner and then click on Account.
- In the lower right section, you´ll find the Recently Deleted table that provides an overview of all items you´ve marked for deletion and for which the grace period of 30 days has not expired yet. It also denotes for each item to which Project it belongs, and when it was marked for deletion.
- Click on the Restore button to restore the item back to the Trash Bin, from where you can restore it back to it´s original source location in the Project (see Restoring Items from the Trash Bin).

Deleting Items immediately
Once an item has been marked for permanent deletion, you can also issue its immediate deletion, terminating the grace period early. This action can be performed only by the Project Administrator who marked the item for deletion. For this:
- Go to your User Account page by clicking on your username in the upper right corner and then click on Account.
- In the lower right section, you´ll find the Recently Deleted table that provides an overview of all items you´ve marked for deletion and for which the grace period of 30 days has not expired yet. It also denotes for each item to which Project it belongs, and when it was marked for deletion.
- Click on the Delete button to delete the item - you will be prompted to confirm this action, as it cannot be undone.
- A pop-up will prompt you to confirm the immediate and permanent deletion of the corresponding item. To confirm, click Delete. To abort, click Cancel.

Considerations
- Files that have been copied to a Dataset will remain in the Dataset even if the original version has been deleted from the Core.
Creating File Collections
When working with Project files in the Core, it can be useful to organize them in temporary or permanent views to help find them more easily. A Collection gives Project members the flexibility to create their own virtual groups of Project files from any number of Core folder locations. Similar to a music playlist, a Collection establishes a reference to the file(s) without moving or copying the actual files themselves. Adding a Collection to your Favourites gives you quick access to it from your Dashboard page.
You can start by creating an empty Collection before adding any files to it, or create a Collection and add files at the same time.
Create an empty Collection

- Navigate to the Project’s Core File Explorer .
- From the Left navigation menu, click Create Collection.
- Enter the Collection name and click Save.
- The new Collection will appear in the left File Explorer navigation menu.
Add files to a Collection

- Navigate to the Project’s Core File Explorer .
- Select one or more files and/or folders by clicking the checkbox beside each one (or use the select all checkbox), then click Add to Collection in File Explorer menu.
Choose one of following options:
- Select an existing Collection and click Add to Existing Collection.
- Click + Create New Collection, enter the name for the Collection, and click Create New Collection. The Collection is created and the selected files added to it in one step. The new Collection will appear in the left File Explorer navigation menu.
Remove files from a Collection

- Click the name of the Collection in the left File Explorer navigation menu to open it.
- Click the checkbox beside the file(s) to be removed, then click Remove from Collection in the File Explorer menu.
Removing a file from a Collection does not remove the file from the Core folder where it is stored.
Deleting or renaming a Collection

- Click the name of the Collection in the left File Explorer navigation menu to open it.
- Click either the Delete or Rename tool in the File Explorer menu.
Deleting a Collection does not remove the files from their Core storage folders.
Considerations
- Collections can only be created with Project files from the Core.
- Collection names cannot exceed 20 characters.
- A file can be added to one or more Collection(s).
- Adding or removing files in a Collection does not change the file's storage location or data lineage.
Adding Files and Collections to Favourites
File and Collections from your Project can be “starred” to add them as Favourites and make them quickly accessible in the Favourites panel in the Dashboard
To add a Collection or File to your Favourites, locate the item in the Project File Explorer and click the star icon. To remove from Favourites, click the star again.
Copyright © 2023-2026 Indoc Systems.
HealthDataCloud is powered by Pilot technology, a product of Indoc Systems.